Research Package (RP) supports localization, i.e., the ability to support different languages in an app. This is done in different ways and this tutorial seeks to provide an overview of the localization support in RP. This tutorial uses (mostly) examples from the RP example app, which you should look at and run while reading this.
This tutorial will cover three ways of using localization in RP:
- Using RPLocalization to (also) translate your own app.
- Extending the support for other languages than English and Danish.
- Using other translations methods than assets files.
Using RP to Translate your App
RP comes with built-in translations of the RP text and currently supports – at the time of writing – English and Danish. However, RP can also be used to translate text in your own app, outside of RP.
In RP, translation is supported via the RPLocalization class and is done by calling the translate() method like this:
RPLocalizations.of(context).translate('key');
This statement can be used in all UI elements which needs to be translated, like in the example app:
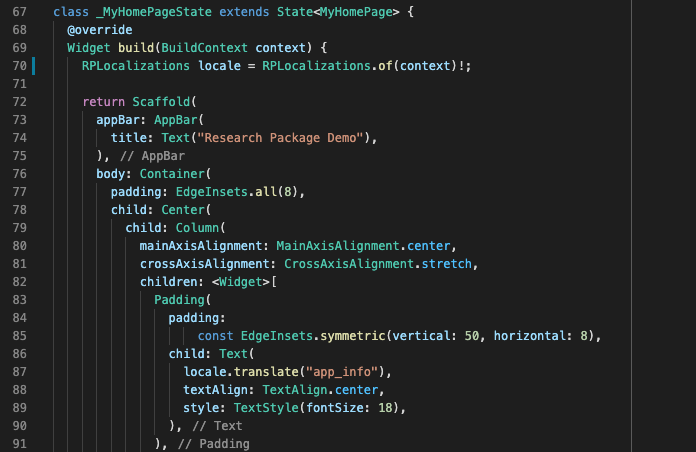
In line 70 we access the current locale via a static lookup on the RPLocalization class. In line 87, the text with key ‘app_info’ is translated into the current locale.
Translations for you app is put in the language json files, to be located in the assets/lang folder. In the example app, there a three languages files added for English, Danish, and French. Hence, the example app would work in these three languages (even though not all text keys are translated).
Language support is configured as part of the MaterialApp setup (just like the normal Flutter localization is setup):
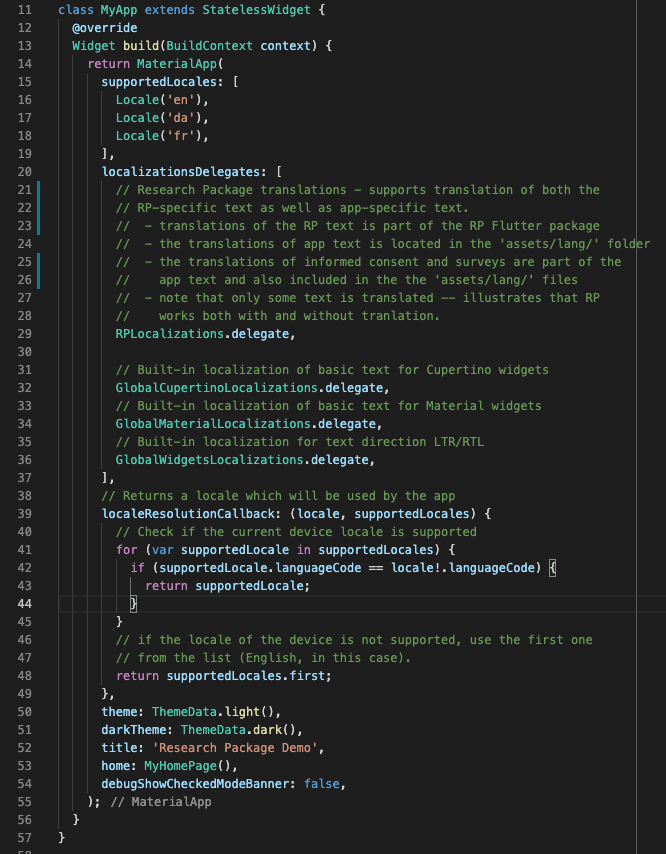
In Line 15-19 the supported locales are listed.
In line 29 the RPLocalizations.delegate is loaded, supporting the build-in-translations from the RP package as well as app-specific translations using the app asset json files.
The rest is “standard” localization setup in Flutter, including making sure to fall-back to English if a locale is not supported.
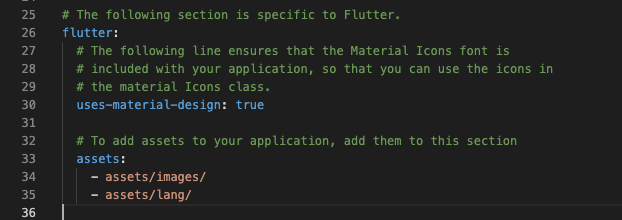
Finally, you should add you language files as assets in the pubspec.yaml file, like this:
Supporting New Languages in RP
Localization in RP is divided into two parts: (i) localization of the text in RP and (ii) localization of text in the app. Figure 4 below show the file and folder layout of RP, including the example app.
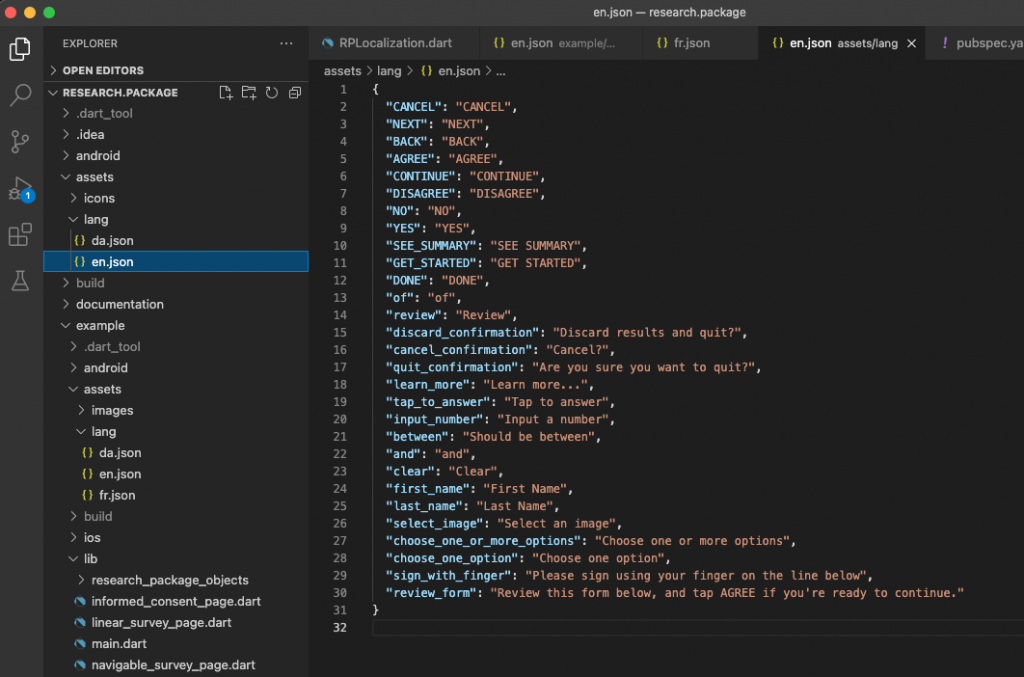
Figure 4 shows that RP has two categories of language files, all named <locale>.json. The language files in the package is located in the assets/lang folder of the package, whereas the language files for the app is located in the example/assets/lang folder. The language files for the package contains translations for the text used in RP solely (and the key/value pairs are shown in Figure 4), whereas the app-specific language files contains translations used in the app (as described above).
If you want to extend the support for other languages to others than English and Danish, there are two options:
- Make a pull request to RP – you create a json file with a translation for the locale(s) not supported by RP and add it to RP as a pull request. This is the preferred approach since in this way, other users of RP will benefit from your translations.
- You add the key/value pairs used in RP (as shown in Figure 4) with a translation to you app-specific json file(s). In this way, RP will look up these translations in these files.
The example app provides an example of (2) where the fr.json file is added to the lang folder of the example app. This entails that the example app supports French, even though RP does not (RP only supports English and Danish, at the time of writing). Note, however, that the french translation in the example app does not contain translations for all the RP text, so you will see a lot of keys being shown in the example app, if you run this in French.
However, we would much prefer a pull request to Research Package so we can extend it with built-in support for other languages. You should add your translated json file to the package assets/lang folder.
Using Other Translations Methods than Assets Files
All of the above translation methods has been using asset files for translations (both i RP and in the app). However, RP also enables you to create your own methods for translating text. This is supported by so-called “Localization Loaders”. The LocalizationLoader is an abstract interface for implementing location loaders – mainly by specifying how to load the translation for a specific locale.
RP comes with a simple example of a in-memory map-based localization loader called MapLocalizationLoader that illustrates how a localization loader can be implemented.
Location loaders can then be used in the RPLocalization delegate. This is shown in the figure below (which should be compared to Figure 2, which do not use the map loader).
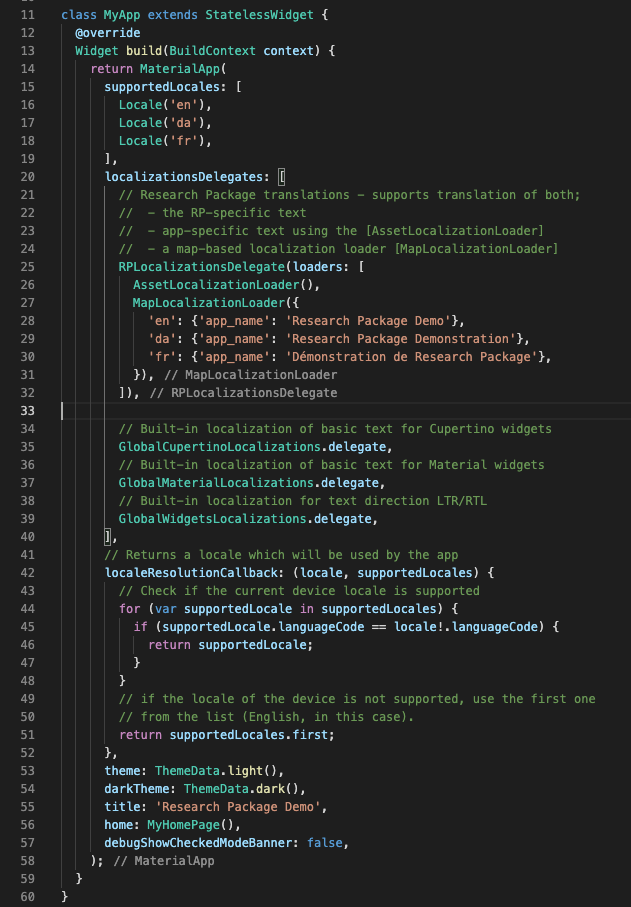
Note that if you (still) wants to load translation files from the local assets, you should also add the AssetLocalizationLoader in the list of loaders, as shown in line 26.
Much more advanced localization loaders can be created and used in the app. For example, the CARP Studies app dynamically downloads translation files from the CARP Web Services backend. This allows for dynamically creating and donwloading surveys with translations for the different supported languages.
As always, we welcome comments and contributions to Research Package using the issues tracker and creating pull requests – actually, this tutorial was written based on issue #54. Comments to this tutorial is also most welcome.