This tutorial will help you create your first app that incorporates mobile sensing using the CARP Mobile Sensing (CAMS) framework in Flutter. Note that CAMS is designed to be a framework implemented as a Flutter plugin which allow you to add mobile sensing to your own app. Hence, CAMS is not an app on its own, and you need to design and implement you own app.
So – having said that – let’s get started.
Step #1 – Learn, install, and understand Flutter & Dart
The first obvious step is to get yourself familiarised with Flutter, including understanding its programming language Dart. I will not provide a long tutorial on how to do this – there are plenty of resources available online – both in text, video, and tutorial formats.
But – one obvious starting point is the Flutter “Get Started” site, including the tutorial on “Write your first Flutter app”.
Step #2 – Get familiar with the BLoC architecture
A Flutter app can be implemented using many different software architectures. The Flutter Samples website provides a very nice overview and have many examples available on Github. So the problem in Flutter is not the lack of useful software architectures – the problem is rather to pick a architecture that fits your app design, your skills, and not least; your preference.
CAMS is designed as a Flutter plugin, which can be added to a Flutter app and agnostic to whatever architecture the app is using. So far, CAMS have been used in apps using an “Vanilla Lifting State Up”, “InheritedWidget”, and “Business Logic Component (BLoC”) architecture.
However, having said this, we recommend using the BLoC software architecture for CAMS apps. The BLoC software architecture is very mature in terms of many supporting frameworks and examples in Flutter, and it fits very nicely with the reactive, stream-based programming model of Dart.
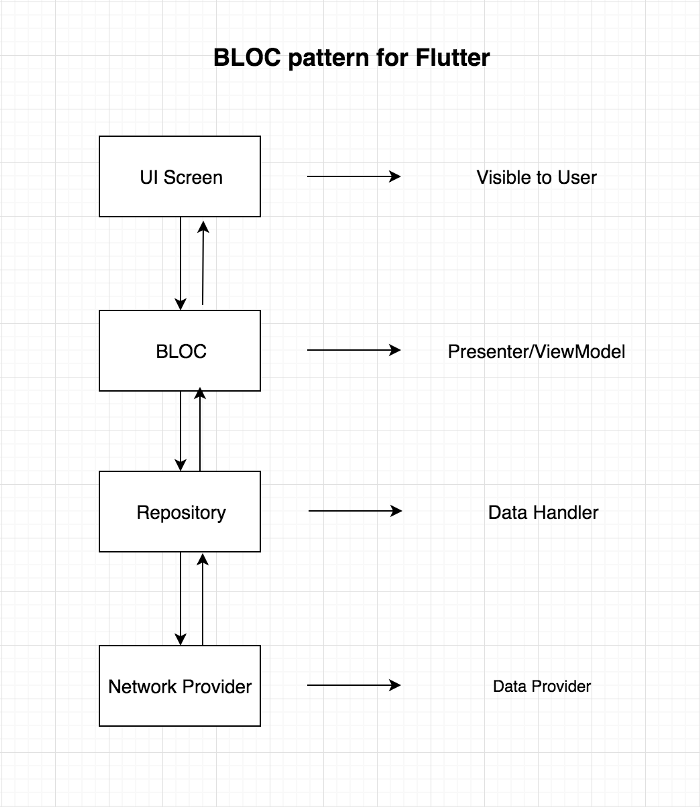
So – go and check out the “Getting Started” BLoC tutorial. And check out the flutter_bloc package. And this Medium post provide a very good starting point too, from where the image below is taken from.

Step #3 – Install, study and run the CAMS Example App
The next step is to investigate the CAMS Example App. This app provide a good example of how to structure a simple app that incorporates mobile sensing while using the BLoC architecture for the structure of the app.
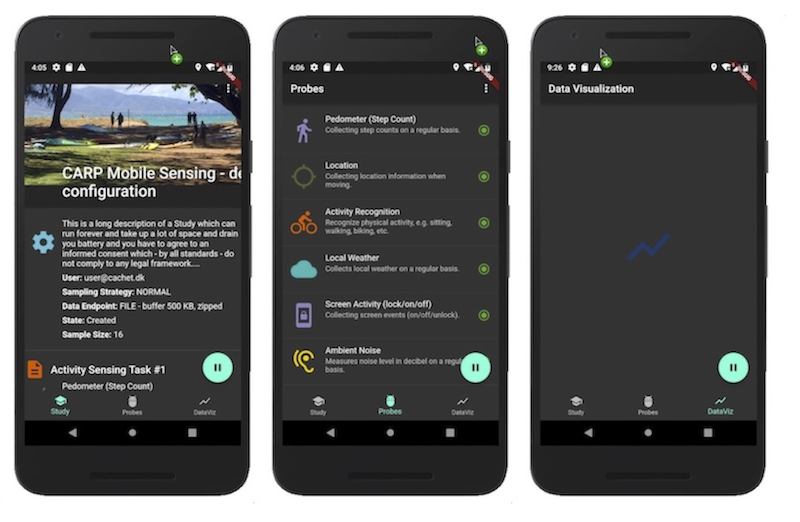
The app sets up a Study that starts a set of Probes and visualizes the data. The UI of the app is shown below, showing (from left to right) the Study Visualization page, the Probe List page, and the Data Visualization page (the latter is not implemented yet).

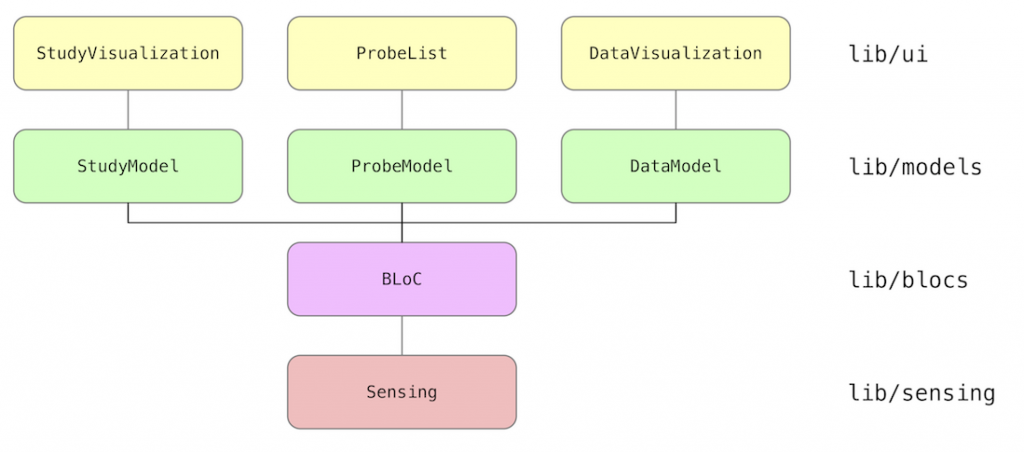
The BLoC architecture of the app is illustrated below.

The code examples are on Github.
Step #4 – Learn about the CAMS architecture, domain model, etc
Now it is time to dig into the inner working of CAMS and how it is used to set up a mobile sensing study.
The CAMS tutorial provides documentation on topics like:
- Software Architecture – the overall picture.
- Domain Model – the detailed picture of the data model(s).
- Using CARP Mobile Sensing – how to use the framework in your app.
- Extending CARP Mobile Sensing – how to extends the framework, with a focus on new sensing capabilities and external (wearable) devices.
- Best Practice – tips and trick, especially related to differences between Android and iOS.
Step #5 – Start building your app
Finally, it’s time to design and implement your own mHealth app that includes CAMS for mobile sensing. Doing this, note that each of the CAMS Sampling Packages holds its own detailed documentation on how to install and use these packages and the measure types they each support.
All CAMS packages are available on pub and you should alway use the official released version there.
The “Best Practice” page is updated with tips and trick as we find them and inputs for this page is most welcome.
All issues – including problems with the documentation – can be reported in the CAMS Github Issue tracker.
As an open-source project, we always welcome help in maintaining and extending CAMS and pull requests are welcome.